In Magento, it is possible to store configuration values for global, website or store in the backend. These values can be used to store simple module settings such as API -keys, module enable/disable options. The data then will be stored in the core_config_data table.
Create a new Magento 2 module: Jeff_Sample
module.xml file:
#app/code/Jeff/Sample/etc/module.xml

<?xml version="1.0"?>
<config xmlns:xsi="http://www.w3.org/2001/XMLSchema-instance" xsi:noNamespaceSchemaLocation="urn:magento:framework:Module/etc/module.xsd">
    <module name="Jeff_Sample" setup_version="0.0.1"/>
</config>
registration.php file:
#app/code/Jeff/Sample/registraction.php

<?php
    \Magento\Framework\Component\ComponentRegistrar::register(
        \Magento\Framework\Component\ComponentRegistrar::MODULE,
        'Jeff_Sample',
        __DIR__
    );
Create your own configuration options with the following step
Create the system configuration file:#app/code/Jeff/Sample/etc/adminhtml/System.xml <?xml version="1.0"?> <config xmlns:xsi="http://www.w3.org/2001/XMLSchema-instance" xsi:noNamespaceSchemaLocation="urn:magento:module:Magento_Config:etc/system_file.xsd"> <system> <section id="sample" translate="label" type="text" sortOrder="100" showInDefault="1" showInWebsite="1" showInStore="1"> <label>Sample Configuration</label> <tab>general</tab> <resource>Jeff_Sample::config_sample</resource> <group id="demo" translate="label" type="text" sortOrder="100" showInDefault="1" showInWebsite="1" showInStore="1"> <label>Sample</label> <field id="header" translate="label" type="text" sortOrder="1" showInDefault="1" showInWebsite="1" showInStore="1"> <label>Header Title</label> </field> <field id="selectsample" translate="label" type="select" sortOrder="2" showInDefault="1" showInWebsite="1" showInStore="1"> <label>Sample Select</label> <source_model>Jeff\Sample\Model\Config\Source\DemoList</source_model> </field> </group> </section> </system> </config>
Creating a new tab
In this example, I use the tab named general to put our configuration options. When the configuration options can’t fit in one of the existing tabs, it is possible to add your own through system.xml file. For example, add the following to your system configuration file:
<tab id="<unique tab name>" translate="label" sortOrder="<sortorder>" class="<class>">
    <label>[label]</label>
</tab>
Some explanation:
- id: This is a unique identifier for the tab, which is also used to reference to the tab in your sections
- translate: This specifies the elements that need to be available for translation.
- sortOrder: This is the numeric value to use to sort the tabs
- class: This is the optional class name for your tab.
Creating a new section
Every section is the tab referenced in the configuration. In every section, multiple groups can be configured that can hold multiple fields. Adding a new section can be done by adding the following to your system.xml file:
<section id="<unique_section_name>" translate="lable" type=""<text>" sortOrder="<sort order>" showInDefault="<0|1>" showInWebsite="<0|1>" showInStore="<0|1>">
    <class>[Class]</class>
    <header_css>[Header_csss]</header_css>
    <label>[label</label>
    <tab>[tab]</tab>
    <resource>[Resource name | ACL name]</resource>
    [group] <-- see create a new group
</section>
The attribute used are as follows:
- id: This is the unique section identifier
- translate: this specifies the elements that need to be available for translation.
- type: This is the type of field used. normally it is text field
- sortOrder This is the numeric value to use to sort the sections
- showInDefault: This shows sections in the default store configuration
- showInWebsite: This shows sections in the website configuration
- showInStore: This show sections in the store configuration
The elements in this configuration are as follows:
- class: This is the class used for the section
- header_css This is the CSS class to use in the text header for the section
- label: This is the text to display in the section
- tab: This is the reference to the tab where the section should be added.
- resource: This is the access control list (ACL), resource referenced.
Creating new group
In a section, it is possible to create multiple groups. They are displayed as separate fieldsets that can be expanded/collapsed and can hold one or multiple fields. To create a new group, add the following in the system.xml
<group id="<group_id>" translate="label" type="text" sortOrder="<sort order>" showInDefault="<0|1>  showInWebsite="<0|1>" showInStore="<0|1>">
    <label>[label]</label>
    [field] <-- see creating a new field
    [field]
    [field]
</group>
Creating a new field
Every group can have one or multiple fields. In the database, the configuration is stored as a path build, {section}/{group}/{field}. a new config field can be one of the following types: text input, textarea, select, multiselect, or a custom data renderer. To add a field, add the following to a group:
<field id="<field_id>" translate="label" type="<type>" sortOrder="<sort order>" showInDefault="<0|1>  showInWebsite="<0|1>" showInStore="<0|1>">
    <label>[comment]</label>
    <comment>[comment]</comment>
</field>
The attributes used for the field configuration are:
- id: This is the unique ID of the field in the group
- type: This is the input type, which can be the following:
- text: Default text input field
- textarea: textarea input
- obsure: password input
- select: drop-down select
- multiselect: this is the multiple item select box
- image: This is the image upload with a preview if the file is uploaded
The re are also some extra elements available to configure thefield:
- label: this is the label, which shows in front of the input field
- comment: this is the comment shown below the input field
- tooltip: this is the text show when hovering the question mark
- frontend_class this is the class used for the field
- frontend_model this is the custom frontend model (block) that will be used to render the input area
- backend_model this is the backend model used when saving the data to process inserted values
- source_model this is the data source used for select and multiselect fields
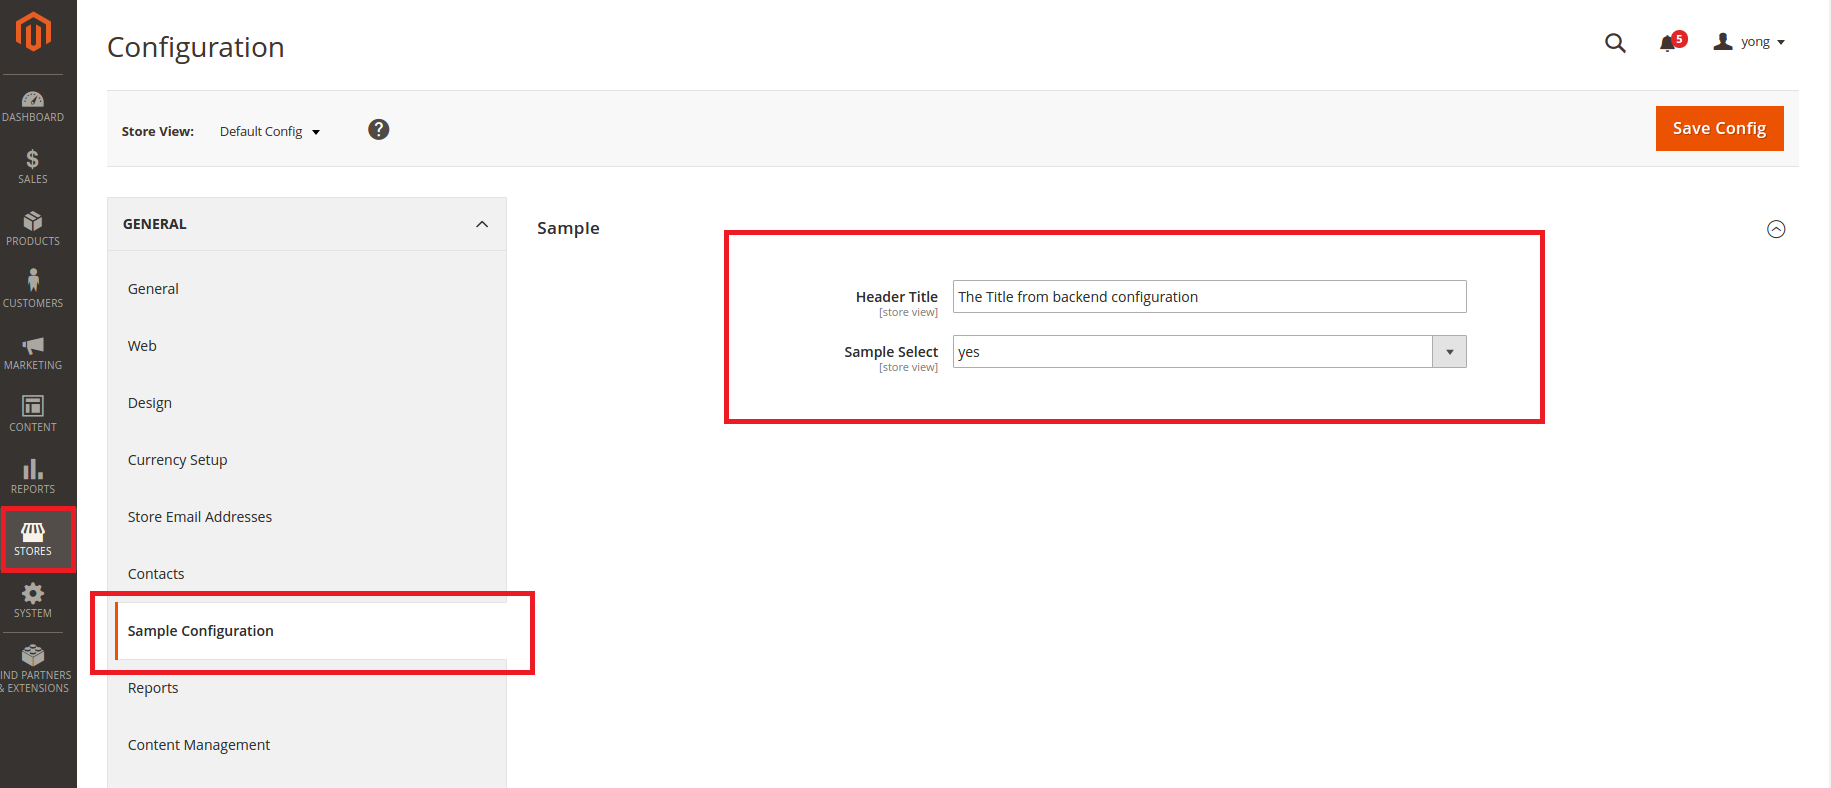
After clearing cache, the backend will be shown as follows[store | Configuration | General | Sample Configuration] :
Get usage of the configuration options value
creating a frontend route:
#app/code/Jeff/Sample/etc/frontend/routes.xml

<?xml version="1.0"?>
<config xmlns:xsi="http://www.w3.org/2001/XMLSchema-instance" xsi:noNamespaceSchemaLocation="urn:magento:framework:App/etc/routes.xsd">
    <router id="standard">
        <route id="jeff_sample" frontName="jeff_sample">
            <module name="Jeff_Sample"/>
        </route>
    </router>
</config>
Creating a controller and action
#app/code/Jeff/Sample/Controller/Index/Index.php

<?php
namespace Jeff\Sample\Controller\Index;
class Index extends \Magento\Framework\App\Action\Action
{

    protected $resultPageFactory;
    public function __construct(
        \Magento\Framework\App\Action\Context $context,
        \Magento\Framework\View\Result\PageFactory $resultPageFactory)
    {
        $this->resultPageFactory = $resultPageFactory;
        parent::__construct($context);
    }

    public function execute()
    {
        return $this->resultPageFactory->create();
    }
}
Creating a Block file
#app/code/Jeff/Sample/Block/Main.php

<?php
namespace Jeff\Sample\Block;
use Magento\Store\Model\ScopeInterface;

class Main extends \Magento\Framework\View\Element\Template
{
    function _prepareLayout(){}

    public function getHeader() {
        return $this->_scopeConfig->getValue('sample/demo/header', \Magento\Store\Model\ScopeInterface::SCOPE_STORE);
    }
}
creating a layout file
#app/code/Jeff/Sample/view/frontend/layout/jeff_sample_index_index.xml

<?xml version="1.0"?>
<page xmlns:xsi="http://www.w3.org/2001/XMLSchema-instance" layout="1column" xsi:noNamespaceSchemaLocation="urn:magento:framework:View/Layout/etc/page_configuration.xsd">
<referenceBlock name="content"><block template="content.phtml" class="Jeff\Sample\Block\Main" name="jeff_sample_block_main"/></referenceBlock></page>
Creating a frontend template file
#app/code/Jeff/Sample/view/frontend/templates/content.phtml

<h1>Jeff Sample View</h1>
<h2><?php echo $block->getHeader(); ?></h2>
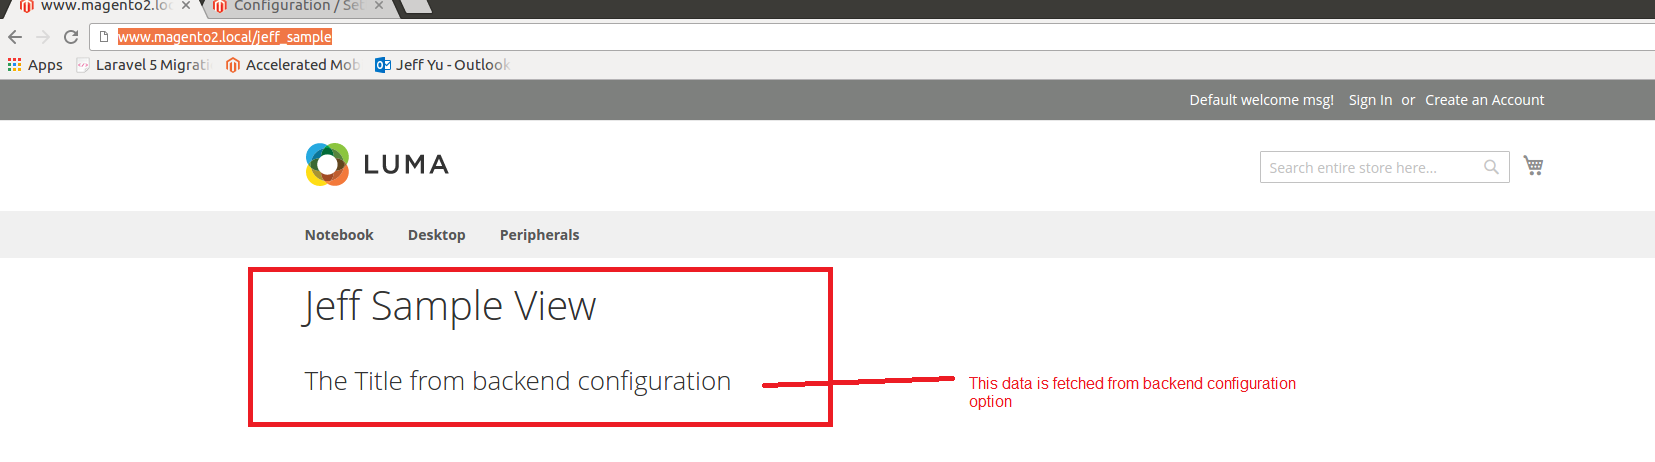
Clearing cache and view the url at http://yourdomain/jeff_sample, you will see as follows:
The whole source code can be downloaded at Github